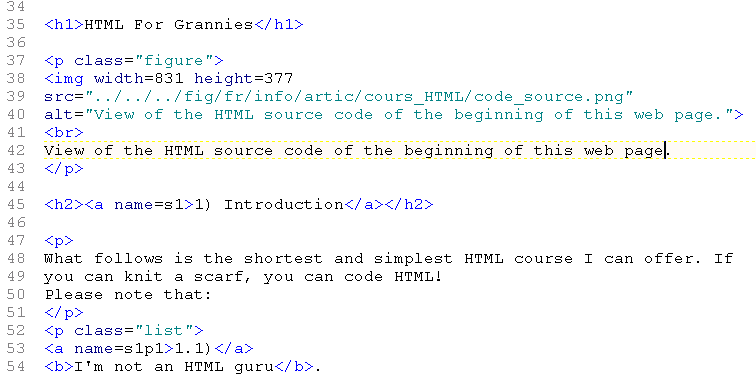
View of the HTML source code of the beginning of this web page.
Let's Adore Jesus-Eucharist! | Home >> Varia >> Software Engineering
View of the HTML source code of the beginning of this web page.
What follows is the shortest and simplest HTML course I can offer. If you can knit a scarf, you can code HTML! Please note that:
1.1) I'm not an HTML guru. Many excellent web sites give far more information on HTML than I do.
1.2) I don't like HTML. Web pages are mostly in HTML, but it's not because HTML is the best markup language imaginable! It's just the accepted standard, unfortunately.
1.3) I only use a small subset of HTML. HTML can get pretty complicated, and on top of that, there are many different versions. I only use a minimal subset of version "HTML 4.01 Strict".
1.4) I code my HTML by hand. I started this web site using Microsoft Word, since it is so easy to create web pages using that program: you just create your document the way you would create any other document, then "Save As..." a web page, and you're done! But after a year, and with prodding from a master, I threw out Microsoft Word and learnt to roll my own HTML. With hindsight, I should have started right away by learning HTML, instead of depending on MS-Word. Hand-coding has several advantages:
- MS-Word sometimes generates HTML which blocks access to other
non-Microsoft browsers (by inserting backslashes into file paths);
- faster-loading pages;
- better-looking site with CSS;
- total control over your site;
- conformance with international HTML standards;
- etc.
I currently use Textpad and some macros to code my web site. But I know some HTML gurus who do everything with Microsoft Notepad (a lousy little piece of software available on all Windows computers). To make a long story short, you don't need to buy anything to start doing HTML.
1.5) This course uses a few typographical conventions. When I talk about what you see in your web browser, I just use this font and background color. But when I want to talk about what you actually type and see in your word processor, I use this format:
Hello from inside the program
you use to make HTML pages!
Also, to distinguish your contents from the actual HTML, I keep the HTML codes in a different color:
Notice the HTML code at the beginning and end of the following <b>word</b>.
1.6) I know several «grandmothers» who are prisoners. I know several organizations who fight to defend the rights of Catholics, or for some other good cause, and who are «prisoners» of their own web site. In other words, they are at the mercy of a webmaster or some content management software. When I ask them with insistance to put such and such a critical piece of information on their site, they start to complain that "our webmaster is sick", or "our content management software is too complicated for me", or "I'm not a technical person", etc. This text, despite its strangeness, also has a profoundly political purpose, which relates to the very important #414 of the Compendium Of The Social Doctrine Of The Church:
Information is among the principal instruments of political participation.
Before we actually start learning HTML, some Grandmothers might need a refresher on file paths. For whatever strange reason, this problem seems to confuse many less young computer users.
It's really quite simple. A "file path" just tells the computer where to find a file. It's the same thing for Grannies: if your grandmother wants to tell you where to find her ball of yarn, she will say something like:
"Sweet child, could you please get my ball of yarn? It's upstairs, in my bedroom, in my dresser, in the top left-hand drawer."
Real life is organized like that. You have houses, and inside houses you have stories (like the basement, the first floor, the attic, etc.), inside stories you have rooms (like the bathroom, or the kitchen, etc.), inside rooms you have furniture (like a dresser, or a kitchen cabinet, etc.), and inside furniture you often have drawers.
It's the same thing for a computer. If you want to tell the computer to get a file called "cours_HTML.htm" (the name of the file you're currently reading), located in the folder called "divers", which is itself in the folder called "info", which is itself in the folder called "en", which itself is on the web site called "www.inquisition.ca", you will say:
www.inquisition.ca/en/info/artic/cours_HTML.htm
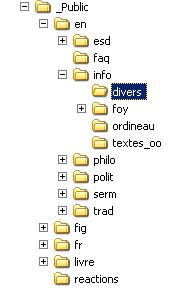
To help you visualize this, you can look at the folder hierarchy for this web site. In this case, the folder called "_Public" is called the "root", i.e. it is the equivalent of Granny's house in our metaphor:
File paths are not exactly like houses, though, because among other reasons the grandmother can sometimes "be inside a drawer!" Suppose your poor old Granny was inside the bottom-right drawer of the dresser, but she wanted to get the yarn inside the top-left drawer of the same dresser. She could say something like:
../top_left/yarn.htm
Notice the ".." which means "get me out of where I am, but only one level". If Granny had been inside the washing machine, itself in the basement, she might have said:
../../second_floor/bedroom/dresser/top_left/yarn.htm
File paths are used all the time when you code HTML, so you have to learn how to use them. And no, don't put your grandmother in the washing machine.
Before we explain how to add actual contents to your web page, we'll start by creating an "empty" page. I know it sounds strange, but an "empty" page is already a bit complicated.
3.1) Get a simple word processor. You can use any word processor, like Notepad by Microsoft. I currently recommend Textpad.
3.2) Create a new HTML file. Just create a new text file in Textpad or Notepad, and make sure the file name has the extension ".htm". It's probably a good idea to avoid spaces in your file name. For example, this file is called "cours_HTML.htm" ("HTML course" in French), and not "cours HTML.htm" with a blank space. Be also careful with uppercase and lowercase characters, since your web server will probably consider that "cours_HTML.htm" isn't the same file as "cours_html.htm".
3.3) Make sure this new file is in its proper location. Since we'll be adding hyperlinks, and hyperlinks depend on file paths (see point #2 here above), you need to put the file in its proper place (in the folder hierarchy) right from the start. If you move the file later, you'll "break" the hyperlinks (Your Granny won't find her yarn anymore).
3.4) Copy the template into the empty file. On this web site, we use the following template. Just mindlessly copy the whole thing and paste it into your blank page:
<!DOCTYPE HTML PUBLIC "-//W3C//DTD HTML 4.01//EN" "http://www.w3.org/TR/html4/strict.dtd"> <html> <head> <meta http-equiv="Content-Type" content="text/html; charset=ISO-8859-1"> <meta http-equiv="imagetoolbar" content="no"> <meta content="true" name="MSSmartTagsPreventParsing"> <title>[TODO: Add page title]</title> <link rel="stylesheet" type="text/css" href="[TODO: Add file path to CSS]"> </head> <body> <p> <a href="[TODO: Add hyperlink target]">[TODO: Add hyperlink target name]</a> >> <a href="[TODO: Add hyperlink target]">[TODO: Add hyperlink target name]</a> </p> <h1>[TODO: Add page title]</h1> <p> [TODO: Add actual contents here] </p> <p> </p> <p> <a href="[TODO: Add hyperlink target]">[TODO: Add hyperlink target name]</a> >> <a href="[TODO: Add hyperlink target]">[TODO: Add hyperlink target name]</a> </p> </body> </html>
3.5) Set the page title. As you've already guessed, you will need to replace everything marked with "[TODO]", including the square brackets (the "[" and "]" characters). Start with the title (you need to set it in two separate places, one for the window title, and one for the page title).
3.6) Set the path to the CSS file. Even the smallest web sites normally have one CSS file. This file contains the styles used on the web site (for example, the font type, the font size, the background color, etc.). I won't explain how to write up your own CSS file (see #1.1 here above). On this web site, the CSS file is located in the "fig" folder, and is called "stylesheet.css". If you take the example of this very web page, the file path to the CSS file is:
../../../fig/stylesheet.css
You can see the path says clearly (but not in plain English!): "Go up three levels, then go back down one level, but into the "fig" folder; there you will find the CSS file".
3.7) Set the "breadcrumbs". Normally, to help users find their way around your website, you add something called "breadcrumbs", so they can "find their way out". If your grandmother was in the washing machine, she would be much less confused if she saw breadcrumbs like:
Home >> Basement >> Laundry Room
Setting the breadcrumbs is a lot like setting the path to the CSS file, so we won't repeat it here.
After creating the "empty" page, you add the contents (look for the caption: "[TODO: Add actual contents here]"). Here are most of the elements you'll ever need:
4.1) Paragraphs. Apart from a few exeptions, all the HTML you add should be inside some paragraph.
<p>
This is a paragraph. Notice the HTML paragraph marks
at the beginning and end of the paragraph.
</p>
<p>
This is another paragraph. Remember that the line breaks you
see while creating the page have nothing to do with the line
breaks you'll see when you view the page with an Internet
browser. The browser removes all your line breaks and replaces
them with a single space. So if in your HTML page you imprud-
ently cut a word, and add a hyphen, what you will probably
see in the browser is something like this:
</p>
... if in your HTML page you imprud- ently cut a word...
4.2) Bold, italics, etc.. Adding bold, italics and other emphasis is easy. Let's look at the previous sentence inside your word processor:
<p>
Adding <b>bold</b>, <i>italics</i> and other emphasis is easy.
</p>
4.3) Headers. The various sections of your text are set off with headers. For example, the title of this page looks like this:
<h1>HTML For Grannies</h1>
As another example, the title of this section looks like this:
<h2>4) Add the contents to your web page</h2>
Exceptionally, you don't put headers inside paragraph marks. Also, there are four levels of headers.
Hyperlinks are the blue underscored "buttons" that take you elsewhere when you click them. If your grandmother had a magic house, she could be inside her washing machine, click on the hyperlink to her yarn, and bingo, she could continue knitting in the drawer of her dresser!
Hyperlinks can point to a page outside your web site, or to another page on your web site, or to a specific location inside a page.
5.1) External hyperlinks. Let's look at this hyperlink to the Vatican (which, as you probably know, is located at "www.vatican.va"):
Let's look at this hyperlink to the <a href="http://www.vatican.va/">Vatican</a>
5.2) Internal hyperlinks. Internal hyperlinks are just like external ones, just that you refer to a file on your own website. The "breadcrumbs" of point #3.7 here above are made with internal hyperlinks.
5.3) Links to a specific location on a page. Both external and internal hyperlinks can point to a specific location inside a page. The only additional complexity of this type of link is the addition of a "link target". For example, suppose you want to be able to jump to the header of the first section of this page, you'd take the standard header:
<h2>1) Introduction</h2>
and add the "link target", giving it an arbitrary but unique name, like "foobar" or "s1":
<h2><a name=s1>1) Introduction</a></h2>
In order to jump to that "link target", you use a standard internal or external hyperlink, but add to it the "link target" name, separated by a pound sign. Suppose for example the Pope wanted to link to the first section of this web page, from inside a page on the Vatican web site, he would type:
<p>
Hey dudes! Check out this Introduction to an
<a href="http://www.inquisition.ca/en/info/artic/cours_HTML.htm#s1">
HTML Course For Grannies</a>!
</p>
To jump to the same link target, but from inside this page, you'd write:
<p>
To jump to the same <a href="#s1">link target</a>
</p>
Remember, there are entire books on HTML, so I just want to finish with a few features used on this site, without explaining them.
6.1) Various CSS styles. You can invent as many CSS styles as you want. On this web site, I often use a "list style", like the one for this very paragraph:
<p class="liste">
6.1) <b>Various CSS styles</b>...
</p>
6.2) Images. If you have a picture or drawing in ".jpg" format somewhere on your web server, and you know its width and height in pixels, you can add it to a page. For example, the HTML for the above graphic is:
<p>
<img width=193 height=288
src="../../../fig/fr/info/artic/cours_HTML/chemin_acces.jpg"
alt="File paths">
</p>
6.3) Footnotes. Unfortunately, HTML doesn't have footnotes as such, so you have to hack them with internal hyperlinks to a specific location on a page (see Section #5 above). You can see examples of footnotes if you explore the "Précis de philosophie".
6.4) Tables. Here is a simple table:
|
First cell of the first row |
Second cell of the first row |
|
First cell of the second row |
Second cell of the second row |
To better understand such a table, imagine it is a quilt composed of many panels (just like a table is composed of many cells). Imagine you have to lay out all the panels of the quilt in a single line on the floor. You start with all the panels of the first row, from left to right, then all the panels of the second row, etc.
Here is what the above table looks like, when you put it in a line on the floor (keep in mind that "td" means "table data" or "individual panel of the quilt" according to our metaphor, and "tr" means "table row"). If staring at this makes you dizzy, you're not alone.
<table>
  <tr>
    <td>
	<p>
	First cell of the first row
	</p>
    </td>
    <td>
	<p>
	Second cell of the first row
	</p>
    </td>
  </tr>
  <tr>
    <td>
	<p>
	First cell of the second row
	</p>
    </td>
    <td>
	<p>
	Second cell of the second row
	</p>
    </td>
  </tr>
</table>
6.5) Special characters. Quick warning: you can't use the reserved HTML characters in the actual contents of your page. For example, to write "two is less than 4", or "2<4", you need to use special codes like:
to write "two is less than 4", or "2<4"
(You can find all these special codes in many locations on the Internet).
When you're finished, you upload your HTML page to the web site, then check its correctness using an HTML validator (for example, validator.w3.org). Then click on all hyperlinks to see if they work, without forgetting to also check the hyperlinks that lead to the page you've just added. (You can also use a hyperlink checker, like for example the one on validator.w3.org.)
That's it! You now know how to knit a scarf, AND manage a simple web site like this one!
Let's Adore Jesus-Eucharist! | Home >> Varia >> Software Engineering