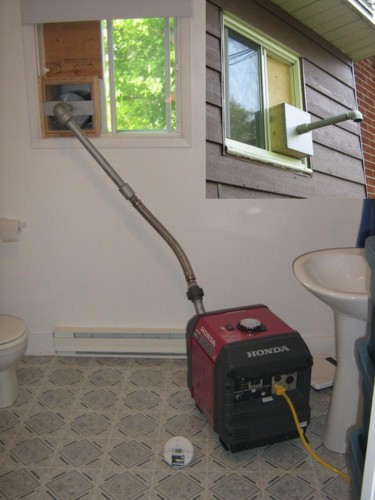
Fig. 1: Portable generator running relatively safely indoors in your home
(but with an inadequate installation; see Section 2.4 below).
Let's Adore Jesus-Eucharist! | Home >> Varia >> Bachelor's Kit
Fig. 1: Portable generator running relatively safely indoors in your home
(but with an inadequate installation; see
Section 2.4
below).
1) Introduction: Important disclaimers
2) Installation and use of the system
3) Construction of the system
3.1) Overall view of the system
3.2) The modified muffler
3.3) The exhaust thimble
Appendix 1) Unknown factors, unanswered questions, and scary
thoughts
Appendix 2)
Various construction, storage and transportation details
Appendix 3) The initial problem: wood stove or portable
generator?
In theory, running your generator inside your house is just a matter of sending the carbon monoxide (and other fumes) outside, and making sure they stay outside. But as usual, the devil is in the details. "Almost perfectly airtight" in this case is the same as "dead by carbon monoxide poisoning". Therefore, before I describe how I rigged my generator to run inside the house, please read the following disclaimers, as well as Legal Consideration #18, and also this whole article, before doing something deadly stupid:
1.1) Carbon Monoxide Poisoning.
Carbon monoxide (CO) is a poisonous gas that results from incomplete combustion of organic materials such as wood, paper, petrol, coal, heating oil, etc. What makes carbon monoxide particularly dangerous is that it has neither color nor odor (you cannot detect it easily), and you get little or no warning just before it makes you lose consciousness. Exposures to 100 ppm or greater can be dangerous to human health.
Hemoglobin (Hb) is what transports oxygen (O2) in our blood, but CO has 240 times more affinity for Hb than O2. So CO reaches Hb, forms the HbCO complex and inhibits the transportation of O2 from the lungs to tissues, therefore starving them of O2 (especially the brain and the heart), therefore killing you.
1.2) The air-pressure test is not optional. Possibly the single most important part in the system is the little cap equipped with a bicycle valve, which lets you perform a leak test on the whole system.
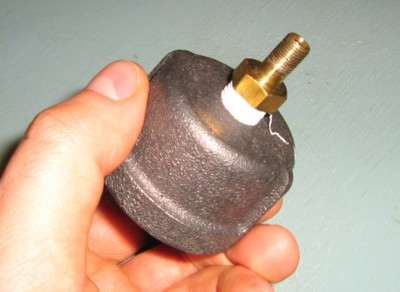
Fig. 2: Cap with valve for essential air-pressure test.
I can't repeat this enough. I myself thought several times that: "Boy my system looks perfect! It must be really air-tight now!", only to be severely disappointed when I failed to pressurize everything with a bicycle tire pump, despite pumping like crazy. Check out what made the before-last test fail:
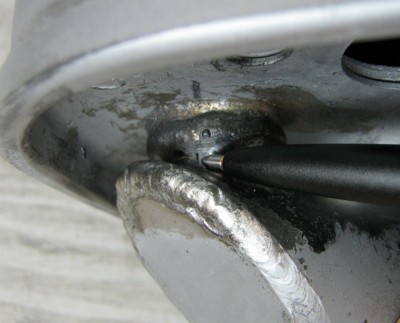
Fig. 3: Killer crack?
That little hole I'm pointing out with a pen prevented me from building up any pressure. I had trouble finding it, and really only located it when I put oil on the general area where I could hear and feel hissing. Can these holes appear after you've successfully tested the system? It's not a question of "if", but "when", so test regularly.
I managed to get at least 20 PSI for a few seconds, in the last test:
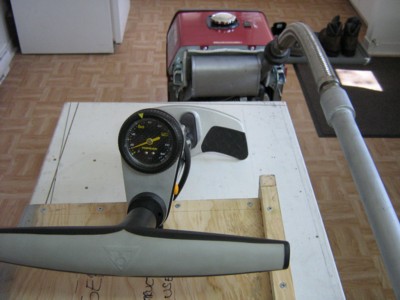
Fig. 4: Successful air-pressure test?
Is 20 PSI for a few seconds enough? I'm not sure. I could not detect where the air was going, and possibly it was "squirting" out of the combustion chamber (past the valves and around the piston head). But at least remember that without air-pressure tests, you're just begging to meet your Creator.
1.3) Totally inadequate testing. As of 2008-June-01, I've only tested my system one half hour, and that was a few days ago (i.e. in perfect conditions: the weather was warm and sunny, I was rested and calm, all of my equipment including the generator was brand new, etc.). I'll have to wait until the next serious winter power outage, to give it a real test.
1.4) I'm not a mechanical engineer. A mechanical engineer would have calculated expected pressures, gas flow rates and temperatures, researched appropriate materials, done a FMEA (Failure Modes and Effects Analysis) and made sure the equipment failed gracefully and safely, etc.
1.5) I'd rather not use it. We all laugh at an inventor who is afraid to use his own invention, but this is exactly the case here: I'm somewhat afraid of my "invention", and I won't use it unless there is a serious winter emergency (in the summer, of course, I'll put the generator outside).
1.6) Be prepared to shell out a lot of money. Running a portable generator inside a house is expensive. My Honda EU3000is cost me about 2500$ CAN in 2007 (including demented Quebec taxes). The muffler extension and accessories cost almost another 1000$. If you're not prepared to spend that kind of money, stay away from this option.
I've never used this setup in a long and serious power outage, but here are some considerations on how to install and use your generator inside your house.
2.1) Set up multiple lines of defense. Engineers will tell you that when something could cause a lot of harm, you need protective measures. And not just one protective measure! This is sometimes called "multiple lines of defense", because if one protective measure fails, another one takes its place. When applied to the case of running a generator inside a house, I currently have the following three lines of defense:
- The aforementioned leak test.
- A separate "generator room". The generator is inside the house, but I divide the house in two: the "generator room", and the rest of the living space. The generator room is "condemned" and its door is kept closed. Some weatherstripping is added to that door to make it roughly airtight.
- Two carbon monoxide detectors. (You can see one of them in Figure 1 above. I put it on the floor just for the picture. It should be placed as close to the source of carbon monoxide as possible, but not so close as to melt it!) One detector is in the generator room, the other covers the rest of living space.
The "generator room" door stays closed while the generator is working, and nobody is allowed inside. The leak test means that no carbon monoxide should be emitted inside the house. But if a leak occurs, the carbon monoxide detector inside the generator room should sound the alarm, and the sealed door should contain the leak. If that second line of defense fails, the carbon monoxide detector outside the generator room should sound the alarm.
2.2) Choose a "generator room" with a good heat sink. An attentive reader noted that if the generator room contains a sufficiently efficient heat sink (for example, a very large uninsulated window in contact with the cold outside air), the net heat effect of running your generator inside your house could be zero! In my specific case, I should probably use the basement as the designated "generator room" for the three-unit appartment building where I live. My basement seems like a good location to put my generator: (1) there are almost no windows; (2) there are plenty of pipes and water heaters that could freeze and burst, and that would be really happy to get a bit of warmth; (3) there is a huge contact area between the basement and the first floor (leading to good heat conduction into the living space); and (4) warm air tends to rise (in this case, toward the living space). My only problem would be carrying the generator down the stairs. Anyway, wherever you put your generator, keep in mind where the heat will flow.
2.3) Provide intake air for engine. The aforementioned attentive reader noted that the combustion engine draws in fresh air during the first stroke of its 4-stroke cycle. If the living space you are trying to keep warm is less airtight than the generator room, the engine will draw cold outside air into the living space you are trying to keep warm.
2.4) Slope the exhaust downward and toward the outside. The aforementioned attentive reader noted that the cold outside air will make moisture condensate inside the exhaust. It's probably better to put the generator such that the whole exhaust device will slope toward the outside (or barring that, have some kind of "P-trap" in the pipe, to collect the water before it runs back into the muffler).
Basically the system is composed of some parts purchased from McMaster-Carr, some parts custom built by your local favorite machine shop (I was well-served by Les Métaux Pressés Québec, Inc), some parts taken off your generator and modified (in this case a EU3000is, supplied by Honda), and the whole system given the final assembly by yourself.
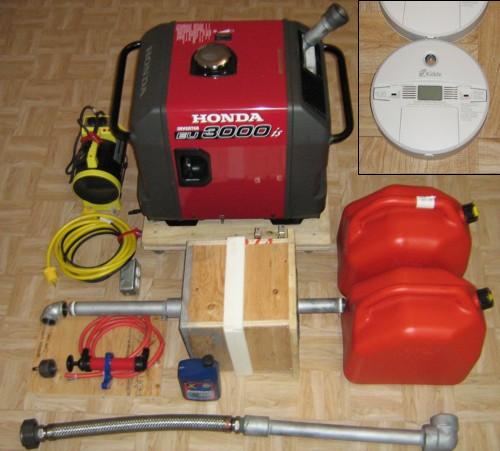
Fig. 6: Generator, disassembled exhaust extension, testing cap, CO detectors, etc.
Unfortunately, I don't have the knowledge or tools to make technical drawings. My best approximation is done with MS-PowerPoint. Here is an overview:
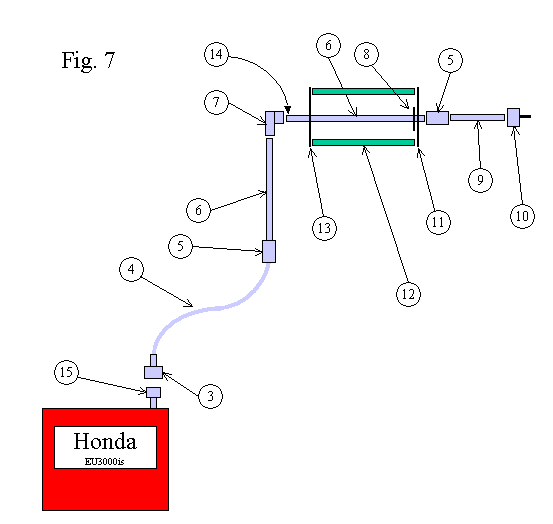
Fig. 7: Exhaust extension exploded view.
Many of the numbers in Figure 7 correspond to the following McMaster-Carr parts list:
|
Part#: |
Description: |
Dimensions: |
# on drawing: |
|
7750K314 |
Pipe, black welded steel, threaded one end (NPT Male), schedule 40 |
1-1/4" * 6" |
N/A |
|
4513K96 |
Standard Union, Black Forged Steel, NPT x NPT |
1-1/4" |
3 |
|
5680K16 |
Type 321 SS Hose with Type 304 SS Braid Male X Male Fittings |
1-1/4" * 24" |
4 |
|
4457K117 |
Pipe, black welded steel, NPT x NPT (quantity: 2) |
1-1/4" * 18" |
6 |
|
44615K547 |
Pipe, black welded steel, NPT x NPT |
1-1/4" * 12" |
9 |
|
4513K66 |
Straight Coupling, Black Forged Steel, NPT x NPT (Qty: 2) |
1-1/4" |
5 |
|
43455K16 |
Female 90° Elbow, Black Forged Steel, NPT x NPT |
1-1/4" |
7 |
|
5530K25 |
Non-stick PTFE-Lined Locknut, Zinc Chromate-Plated Steel, NPT x NPT |
1-1/4" |
8 |
|
44605K107 |
Cap, round head, NPT x NPT |
1-1/4" |
|
|
8063K37 |
Brass Air Tank Valve 1/4" NPT Male |
|
|
|
7549A11 |
Extreme-Temperature Gasket Maker 11 oz (Resbond 907GF) |
|
|
|
7750K113 |
Pipe, black welded steel, unthreaded, schedule 40 |
1" * 6 -1/2" |
|
For the numbers in Figure 7 which don't directly correspond to McMaster-Carr parts, here are some details:
#10) Cap for air-pressure test (Machine shop assembled from McMaster-Carr parts 8063K37 and 44605K107. See Figure 2 above). Of course, remove it before use! I replace it with a cheap 90-degree elbow to reduce the rain and wind blown into the system (you can see it in the outside view in Figure 1).
#11) Outside thimble plate (Machine shop made. See Figure 11 below).
#12) The exhaust thimble. (See Section 3.3 below).
#13) Inside thimble plate (Machine shop made. See Figure 12 below).
#14) Not a part, but just the suggested take-down point for storage. I'm guessing the internal pressure will be greater upstream of the 90-degree bend, so the take-down point should probably be downstream of that elbow. (You can see those disassembled parts at the bottom of Figure 6.)
#15) The modified muffler. See Section 3.2 below).
The modified muffler is the most complicated part (a stock Honda part, plus McMaster-Carr parts, modified and assembled by the machine shop).
First, the stock Honda muffler must have all its joints MIG welded (also called gas metal-arc welding or GMAW), since they are just press-fit and leak like crazy. (I first tried to just slop some Resbond, McMaster-Carr #7549A11, but that didn't work.)
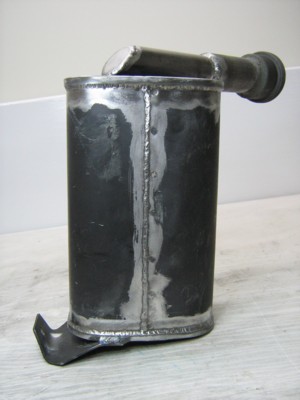
Fig. 8: Welded muffler seams.
You also have to cut off part of the muffler's "outlet pipe" (the part that contains the spark screen) to directly weld the exhaust extension. (Warning: my first attempt was to have an expensive custom part made that would connect to the existing muffler outlet pipe with the existing two screws. I was not able to get a proper seal.)
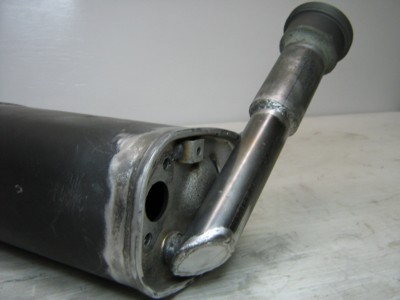
Fig. 9: Muffler outlet pipe.
Here is my attempt at describing the Muffler outlet pipe:

Fig. 10: Muffler side view.
Some details for that drawing:
#1) The connection between the stock muffler and the outlet pipe. (Machine shop). The original Honda muffler comes with an extension which must be cut off at the exit of the muffler, then this remaining hole must be welded to the side of the 1" pipe, and after the end of the 1" pipe must be welded shut. Otherwise you'll have a hard time welding the 1" pipe to the muffler. This is why the 1" pipe is cut at a 45-degree angle: it makes for a nice "door" that lets you make the critical weld.
#2) Pipe, 1" dia., 6-1/2" long (McMaster-Carr #7750K113, cut to 6-1/2" long)
#3) Weld around circumference to join 1" pipe to 1 1/4" pipe. Why two pipe sizes? I was afraid 1" was not enough for a free flow of exhaust gases, and I was also afraid the 1 1/4" pipe would take up too much space in that critical area inside the generator where the stock muffler has to fit.
#4) Pipe, 1-1/4" dia., 4" long (McMaster-Carr #7750K314, cut to 4" long)
#5) NPT Male threads are at this end, which fit with McMaster-Carr #4513K96.
#6) The weld I'm not proud of. See Figure 5.
The exhaust thimble is basically a box made of 3/4" plywood, with 2 metal sides, to prevent the exhaust pipe from scorching the window frame. You can see it in Figure 1, viewed from both inside and outside the house.
The outside thimble plate covers the box completely, to prevent the wind from blowing the fumes back into the house. The inside thimble plate covers the box only partially, so heat inside the box can escape back into the house (and also to let you check to see if the plywood is getting too hot).
The plywood box could be bigger (I sized it based on the smallest window in my appartment). If you make it bigger, you'll need to change the sizes of the outside and inside thimble plates. I'm not worried too much about the small size, since if it does get too hot, I'll just manually keep the plywood wet during use.
Both thimble plates are machine-shop made of mild steel plate (1/8" thickness).
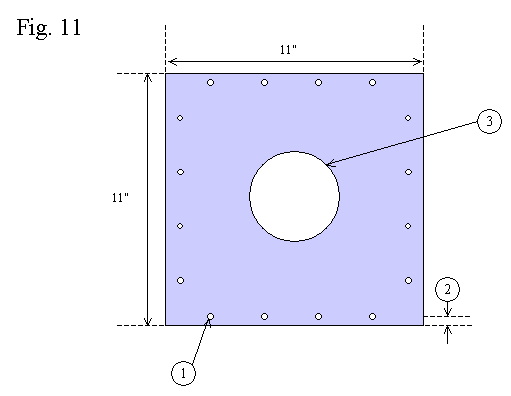
Fig. 11: Outside thimble plate.
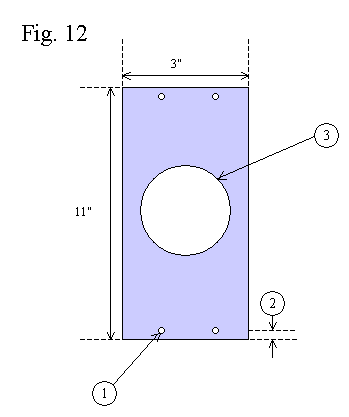
Fig. 12: Inside thimble plate.
Details for Figure 11 and Figure 12:
#1) Screw holes, 3/16" dia.
#2) Center of holes are 3/8" from edge of plate (if you use 3/4" plywood).
#3) 1.660" dia. approx. (snug fit for Schedule 40 1 1/4" pipe)
If I were to build another exhaust thimble, I would use special plywood treated with fire-retardant (FRTW plywood). I might also design it differently, to make it more compact when stored, and simpler to install in the window. For example, a large rectangle of FRTW plywood cut to size to fit in the window, held in the window frame by simple hooks. (I assume you have a window opening for which you can remove the actual window without breaking it.) The "Outside thimble plate" would be roughly the same, but the "Inside thimble plate" would be somehow connected to the "Outside thimble plate". You can imagine the "Inside thimble plate" being like a three-legged stool, with the three legs bolted to the "Outside thimble plate", and the seat of this "stool" being just a ring through which you thread the pipe. So the pipe would be solidly held, and kept away from anything flammable. You could unbolt this "three-legged inside thimble plate" to make the whole contraption more compact. Also, you could more easily have several large FRTW plywood rectangles, one for each window you want to use. So the exhaust thimble could be quickly switched from different windows (e.g. if you take your generator from your house to your cottage, or to your parent's house, or anybody else you are responsible for during a crisis). These FRTW plywood rectangles would all have an identical hole in the middle, to bolt the "Outside thimble plate", but their outside perimeters could adapt themselves to whatever weird window opening you are stuck with. Another advantage would be that you could often have a semi-removable access hatch built into these plywood rectangles. So you could hook it up to a window, and still be able to reach outside to screw off the elbow, and screw in the little cap equipped with a bicycle valve, to perform a leak test on the whole system, after everything has been installed, and before starting the generator. This access hatch would also allow you to "plug" the pipe with something harmless, like a soft rubber ball (that would pop out if you forgot it there and started the generator), so the cold humid air would not flow back into the system while the generator was stopped.
When I tested the system for a half-hour, neither CO alarm detected any carbon monoxide, and I stopped the test because I was afraid the paint would peel, since it was getting so hot inside my bathroom. So safe co-generation of heat and electricity by running a portable generator inside the house appears possible.
I will update this article after the next big winter power outage. In the meantime, feel free to contact me if you have any comments or suggestions about this system.
There are several factors I don't understand. I also have many unanswered questions, and sometimes even some scary thoughts! Here are some of them, in no particular order.
a1.1) Seal between piston and cylinder. Will enough toxic fumes blow past the piston? I'm assuming the seal between the cylinder wall and the piston is not perfect, but how much leaking occurs? Is it negligible for brief periods of use?
a1.2) Airborn toxic refractory fibers. On my generator, the inside cover is lined with some refractory material (glass fibre mat?). Small particles probably fall off, and are blown into the air by the cooling fan. What is their impact on human lungs?
a1.3) Critical weld failure cause by metal fatigue. I'm afraid I made a design mistake, and that therefore there is a critical weld which could fail first, because of metal fatigue.

Fig. 5: First weld to fail?
If this weld fails, then the next weld to fail will be the connection between the muffler and the extension pipe (See Fig. 3 above). I should probably add some sort of welded metal harness, to make sure that pipe stays connected to the muffler, despite the engine vibrations and the inertia of the heavy muffler extension.
a1.4) Propane conversion kit. A buddy engineer of mine says: "You may want to look into whether there are propane conversion kits for the Honda generator. That would be much safer to handle and store than gasoline, and may even be less of a carbon monoxide hazard since propane forklifts are regularly used indoors."
Upper muffler protector. You will have to hack a hole in the Upper muffler protector for the muffler outlet pipe. You can see this in Figure 5.
Resbond 907GF. I tried to connect all pipes "dry", but I could not get an airtight seal. So I put a ring of Resbond around each male connection, not at the start of the threads, but more toward the last 1 or 2 threads. So when I screwed the parts together, the last few turns actually engaged the ring of Resbond (and made some weird crunching sounds!).
Rust on metal parts. To try to avoid rusting, I painted as many parts I could with "Tremclad high heat enamel", which claims to be rated at 650 Celcius.
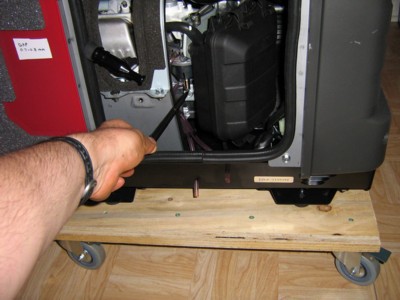
Fig. 13: Carburator drain screw.
Storage of the generator. After use, pump the fuel out of the fuel tank (the little pump I use is rolled up, toward the bottom left, in Figure 6 above). Then drain the carburator (see drain screw in Figure 13 above). Finally, remove the spark plug, add about 15 mL of oil, put the spark plug back, crank the engine by hand a few turns, and stop when the piston is in compression. Charge the battery every month. (All this will probably be described in detail in the Owner's Manual for your generator).
Transportation of the generator inside the house. Note in Figure 13 above the little plywood wheeled platform. The generator is about 140 lbs, and I'm getting old. I wheel it to its destination, then I kneel down and just lift the generator off the platform and set it down where I want it, without hurting my back.
Gas storage. I don't have a perfect solution, unfortunately. I keep my gas in a shed outside, with "STA-BIL Fuel Stabilizer" mixed in, and give my Mom some free gas every 3 months for her car. She doesn't complain, and I don't have to worry about old gasoline. I might be able to keep it for 6 months at a time, but I don't have any hard data, so I play it safe with my Mom's fuel injectors.
Connection of appliances. I made myself an extension cord (yellow bundle, middle left of Figure 6 above) that has an extra cable running out of the metal outlet box. This extra cable goes to a male 120V three-pronged plug, which only has the ground prong connected. So I plug the extension into the generator (See yellow cable in Figure 1 above), but also the other cable into any grounded outlet in the house. So I get a good ground for the system, without mixing the generator and house electrical systems (which would require a trained electrician and more "immobile investments"). The extension cord passes in a discreet notch in the bathroom door frame, so the door can be closed for additional safety (See Section 2.1 above).
Quebec City can get quite cold and snowy in the winter, and power outages do happen. So I wanted something to avoid freezing in the dark. Eventually, I'd like to get both a wood stove and a portable generator, but for the time being, limited money and space in my appartment made me chose only one of the two.
A wood stove has many advantages, among others:
- It can easily heat a whole house;
- If you buy well-packaged artificial logs, you don't have to worry about
bringing insects into your house;
- Totally quiet operation;
- If installed by a professional, it's relatively safe against fire and
carbon-monoxide poisoning;
- In a pinch, you can burn just about anything (your mother-in-law's
favorite old furniture, branches and trees knocked down by the wind, etc.).
It seems to me a wood stove also has disadvantages:
- Occupies a large volume (if you include the chimney and the logs);
- Not easily portable (a well-installed chimney tends to become part of
the house).
- Still leaves you without any electricity, and so many things these
days are electrical! (lights, power tools, computer, refrigerator, etc.)
- Totally useless in the summer (and summers are getting longer and hotter).
A portable electric generator has many disadvantages too:
- Fuel is very expensive, dangerous to store, and has limited shelf
life;
- The generator itself requires a lot of careful maintenance, and remains
very fragile compared to a wood stove;
- As opposed to a high-quality wood stove which can last many years,
a generator lasts a few thousand hours (I've heard about 10 000 hours
for a gasoline generator).
- VERY noisy!
There are three other disadvantages of portable electric generators, which I thought I could eliminate by running it inside the house:
- The generator must be protected against the elements (rain, snow, etc.),
especially since the weather tends to be horrible when you most need a
generator (ice storms, violent winds, flooding rains, etc.);
- Portable generators are very attractive to thieves. Not only are generators easy
to find because of their noise, but they are easy to steal because they are
portable. Also, thieves are particularly active when all city lights are
out and policemen are busy elsewhere (which are exactly the conditions when
you actually need a generator!);
- Internal combustion engines are very inefficient, so trying to heat a house
with an electric heater powered by a portable gasoline generator probably
has an efficiency of 10% or less (i.e. 100 units of energy in your gasoline
will give you about 10 units of heat in your house.).
If I could solve these last three disadvantages, the generator seemed like the best solution for me. First, it would be automatically protected from the rain and snow. Second, the thieves would have to pry it out of my warm, live hands (instead of just backing up to the generator outside the house and lifting it into their pickup). Third, much of the waste heat produced by the engine would be recycled to heat the house (also known as "co-generation", since we use the waste heat produced by the generation of electricity).
Please note that I have very specific needs (so a generator might not be your best option). For example, I'm relatively comfortable dismantling and fixing gasoline engines. Moreover, I plan on using my generator as often as my fire extinguisher, i.e. never, God willing! (So the short lifespan of a generator is not a problem for me). Also, I'm very meticulous (so if a complex procedure must be respected to do something safely, I should be able to follow it). Also, I plan to use the generator inside in horrible winter weather only, therefore all doors and windows will be closed, and strong winds will be blowing, therefore it is less probable that toxic fumes will be blown back into the house.
But for me, the strongest argument was that I find it somewhat of a contradiction in terms to talk about "immobile emergency equipment". When disaster strikes, you often need to change locations, and a generator is more portable than a wood stove.
Let's Adore Jesus-Eucharist! | Home >> Varia >> Bachelor's Kit